Staging Sites and Cloning on SiteDistrict
Develop, Speed Test, and Debug WordPress sites
At SITEDISTRICT each WordPress site can have zero or more staging copies or clones. Creating a staging copy of your site is fast & easy, and usually takes less than a minute.
If you're in a hurry, and just want to understand how to use this functionality, jump down to the Creating a Staging Site section. If you're trying to make your changes live, skip to the Go Live / Push / Pull section.
Staging Sites - An Intro
What is a Staging Site?
A staging site is a copy of your WordPress site that can be used for testing plugins, theme & core updates, a site redesign, debugging, and more. It includes all the files for a site (WordPress core files, your themes, plugins, and uploads), as well as the MySQL database.
Features
At SITEDISTRICT, we've crafted a staging system that is powerful, flexible, fast, and easy to use. It's easily one of the favorite features of many of our customers.
Here's a quick summary of the highlights of our staging system:
- Fast: create a clone in seconds, quick "Go Live", push, or pull changes just as quickly
- Secure: isolated from the live site and other clones, HTTPS by default
- Flexible: duplicate any clone, create multiple staging sites, make any clone live, push & pull changes between clones, rename a clone
- Fully Automated: URLs are updated automatically, caches cleared
- Clean: name clones what you want, using friendly URLs that make sense
- Backed up: backups for each clone, and new backups created by default before a pull or push
Uses
There are several reasons why you might use a staging site. Here are some of the common ones:
- Debug: Disable plugins, add debug code, or enable WordPress debugging - without affecting your live site
- Optimization: Test out performance tweaks, clean up your site, remove unused plugins
- Site Redesign: Change your layout, your theme, and more ...
- Testing: Try out new plugins to see if they provide the functionality you want, and double-check that they don't cause problems
Terminology
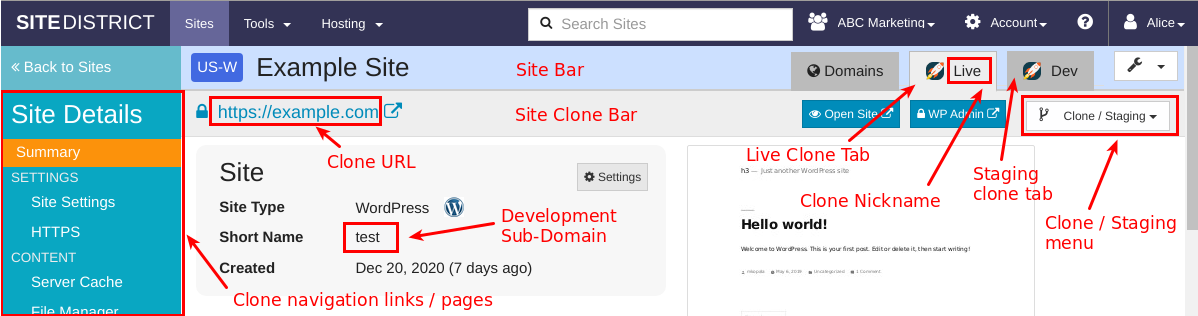
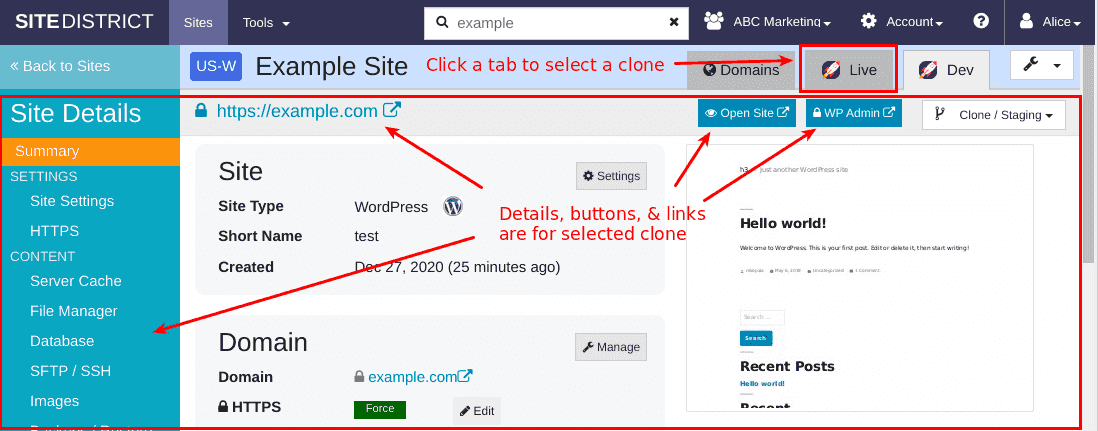
To best understand staging sites on SITEDISTRICT, we've defined some terminology. This screenshot labels some of the important parts of the interface that are relevant to staging:
Glossary
- Site: An individual website, including all the different versions and copies of the site. This could include copies of the site that are hosted on other hosting providers.
- Site Clone or Clone: A complete install of WordPress, including the files and MySQL database. A Site can have one or more Clones.
- Site Domain: A domain that you own or control that is associated with the site.
- Live Site (or clone): The site Clone at which the Site Domain is pointed.
- Staging site: a Site Clone that is not the Live clone.
- Sandbox site: same thing as a Staging site
- Clone Nickname: a short, one-word nickname for the Site Clone. This nickname is displayed in the interface and is also used for the Staging Subdomain
- Staging Subdomain: each Staging Site on SiteDistrict is accessed via a URL that is made up of the site's development subdomain, and the Clone Nickname of the Staging Site. Example:
mysite-dev.sitedistrict.com - Site Bar: the light blue navigation bar that sits just below the top-most dark navy blue navigation bar. This bar contains the tabs for selecting the different Site Clones, as well as the green button to create a new staging site, and the wrench dropdown menu, for managing the entire Site (including all the clones).
- Site Clone Bar: the light gray navigation bar that contains the Clone URL and the Clone / Staging tools.
- Go Live: the process of converting a Staging Site to become the Live Site
Creating a Staging Site
Creating a staging site on SITEDISTRICT is quick and easy. This section will walk you through the steps.
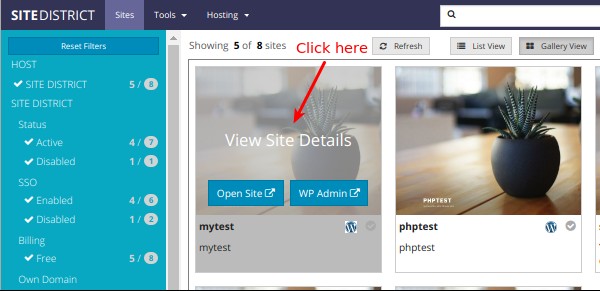
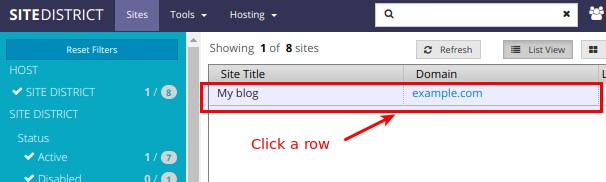
Select a Site
From the Sites list of the gallery, click on a site to open up the Site Details view for the site:
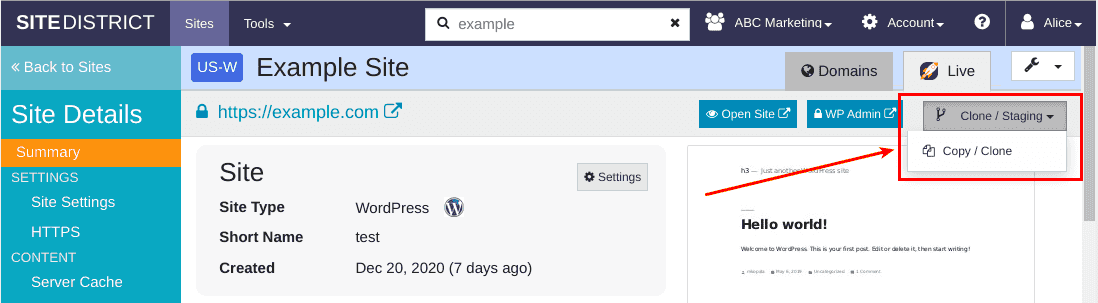
Clone an existing Site Clone
Once you are viewing the details for one of your sites, you can click on the Clone / Staging menu at the top right of the Site Clone Bar. Select the Copy / Clone option.
You will be shown a dialog where you can confirm the source for the staging site (by default, it will be the currently selected Site Clone). You can also then select a Clone Nickname for the new staging site, which will be used for the Staging Subdomain. By default, dev will be used.

Advanced Tip: If you have multiple site clones, you can first click on the Site Clone Tab for the site clone that you wish to copy.
Click the Clone Site button, and we'll start copying your site.
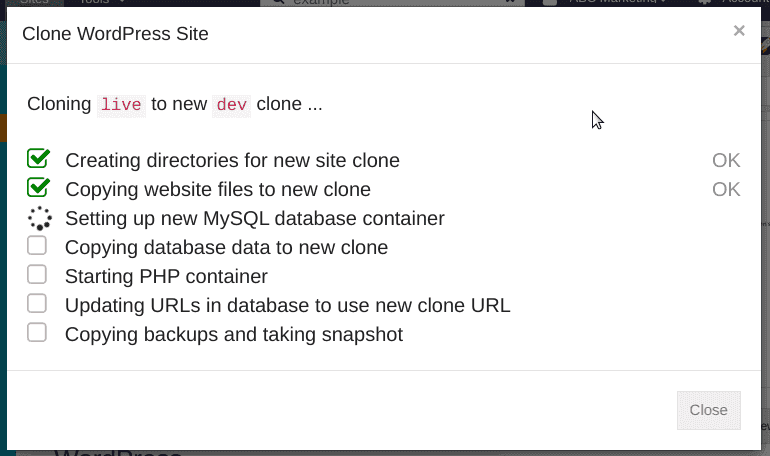
The time it takes to clone a site depends on the size of the site but typically finishes in 30 seconds to 2 minutes.
Make Changes
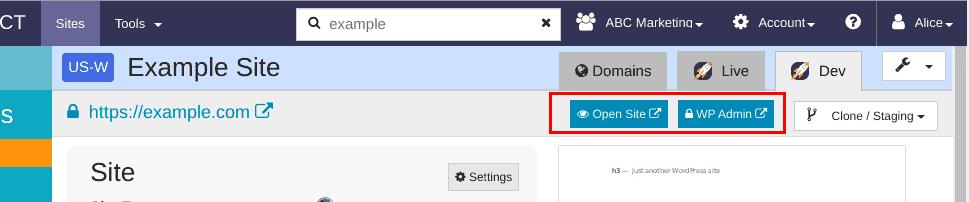
Once you've created your new Site Clone, you can start making changes as desired. You can use the blue Open Site and WP Admin buttons in the Site Clone Bar to open the front-end and back-end of the newly created site.
Go Live / Push / Pull
After you have made your changes or updates to a staging copy of your site, there are several ways to either make them live or copy your changes to either the live site or another clone.
The Clone / Staging menu at the top right of the Site Clone Bar has several options that you can select:

Which one you select depends on which clone you have selected, your workflow, and your desired results.
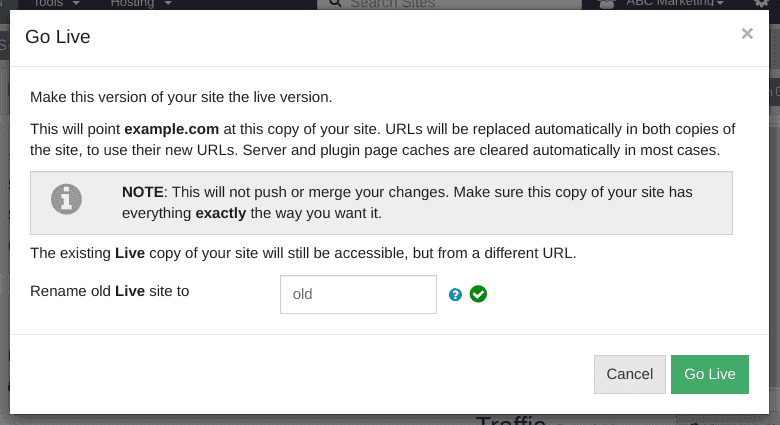
Go Live / Swap
When you "Go Live" with a site clone, you replace the live version of the site with the staging copy. The old "Live" version of the site will be renamed (by default) to Old.
This doesn't copy any files or database data between the clones. Instead, this option points the domain / URL of the live site at the staging copy, making it "Live" instead.
You can reverse this effect just as easily, by choosing Go Live again, from the Old clone.
NOTE: When you "Go Live" with a staging copy of a site, SITEDISTRICT will automatically update the URLs in the database on both copies of the site to the correct (new) versions.
Push Changes
If you don't need or want to keep an immediately-available copy of the old "live" site around before making your changes live, you can push your changes directly to the Live clone (or another clone).
You might want to use this option instead if you have more changes that you plan to make shortly after pushing live, and you want to start making those changes on your Dev clone without creating another (new) copy of the live clone after using the "Go Live" method described above.
To push your changes, select the Push Changes option from the Clone / Staging menu. You will be shown the Push Clone Changes dialog:
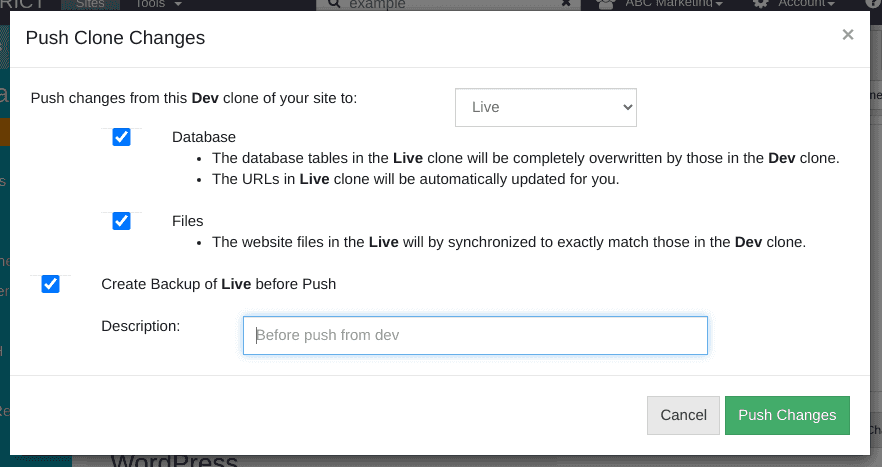
Once you have reviewed and selected the desired options, click the Push Changes button.
Pull Changes
Pulling changes is the opposite of pushing changes. You might use this if:
- You made updates to the Live site and want to pull them into an old Dev clone so that you can make new changes.
- You happen to think in reverse, and you want to pull changes to your Live clone from the Dev clone to make them live.
The second option is equivalent to using Push Changes, but selecting the Live clone tab first.
To pull changes from another clone, select the Pull Changes option from the Clone / Staging menu. You will be shown the Pull Clone Changes dialog:
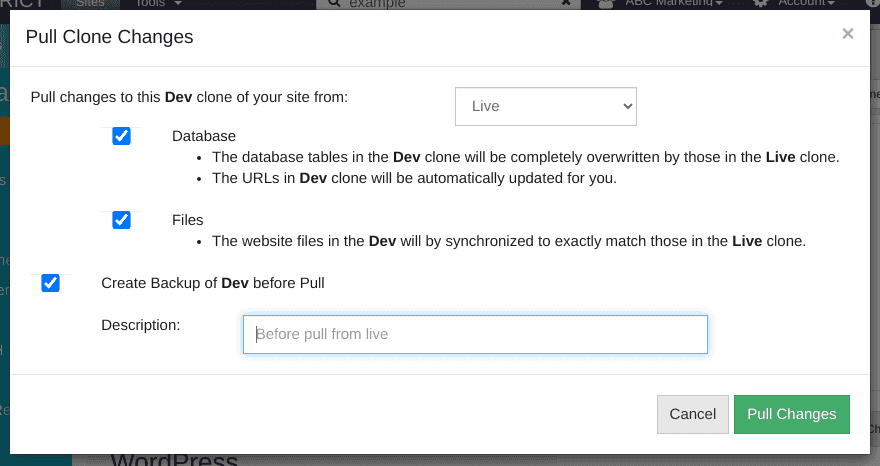
Once you have reviewed and selected the desired options, click the Pull Changes button.
Cleaning Up
It's easy to delete staging copies or clones of your site, as well. There are a few reasons you might want to do this.
- After you "Go Live" with a clone, you might decide you no longer need the old version of the live site.
- You used the "Push / Pull Changes" feature to sync your changes over to your live site, or another clone, and you no longer need the "extra" clone.
- You might decide that the changes that you made on your staging copy are bad, not worth keeping, or no longer needed.
If any of these apply, you can delete the clone or staging site. See the Delete a Clone section just below for instructions on how to do that.
Working with Clones
In addition to creating new clones, promoting a staging clone to be live, or pushing or pulling changes between clones, you'll probably find yourself switching between clones, wanting to clean up and delete old clones, and creating & restoring backups. This section covers those topics.
Switching Between Clones
Switching between clones is fast and easy. Just click the tab in the Site Bar for the clone that you wish to interact with. All of the links, navigation, and pages below the Site Bar will match the currently selected clone.
Delete a Clone
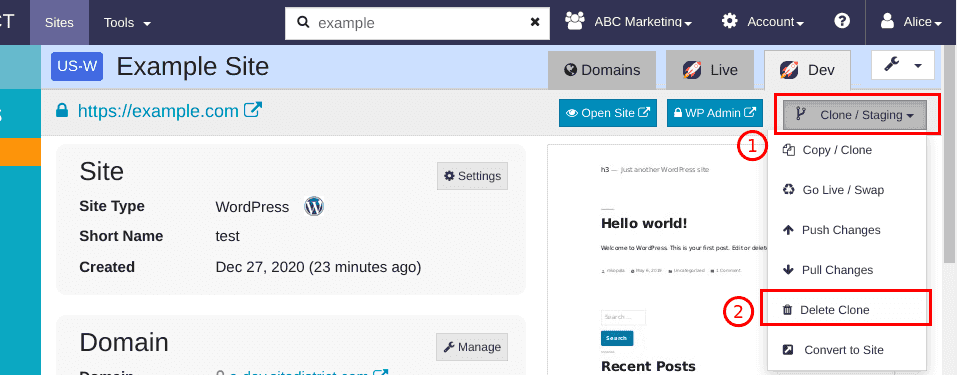
To delete a clone, select the Delete Clone menu option from the Clone / Staging menu:
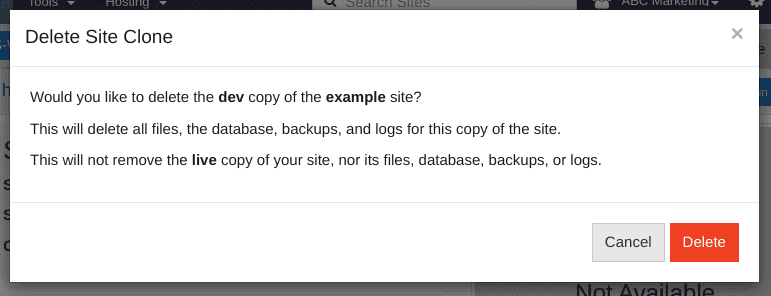
Click the Delete button to confirm the deletion:
Rename a Clone
Sometimes you might decide you want to change the name of your staging clone, for example from "dev" to "staging", or "test" to "final", etc. SITEDISTRICT makes this easy.
Note: The Live clone cannot be renamed. It also does not include its name - "live" - in the URL.
To rename a clone, select the Rename Clone menu option from the Clone / Staging menu:
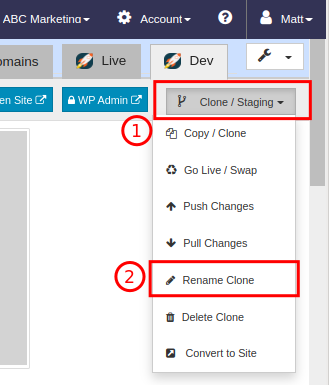
You'll be shown a dialog like this:
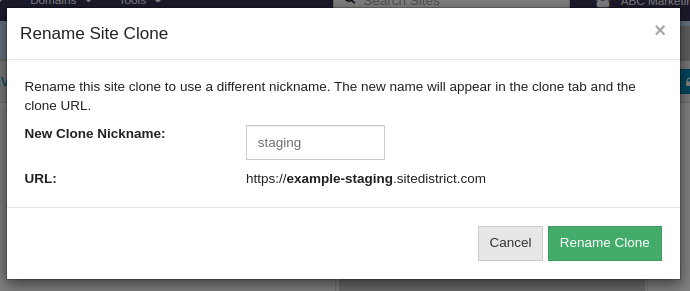
Pick the new nickname, preview the URL, and then click the Rename Clone button to confirm the change. You'll then see the progress as the steps to finalize the change are completed.

Backup and Restore
Each site clone has its own backups. When you create a new clone, the backups are copied from the source clone.
Two special restore features that we offer related to clones are:
- You can restore a backup from one clone to another.
- You can create a new clone from an existing backup.
See our Backups and Restore page for more information about these features.
Advanced Cloning Options
In addition to creating staging copies or other clones within a site, SiteDistrict also lets you copy a clone to create a new site, copy a clone to a different site, move clones between sites, and move / convert a clone to a standalone site.
With these features, the SiteDistrict platform lets you do pretty much anything you can think of in terms of creating, copying, and moving clones around, freeing you from restrictions, and letting you work in a way that makes sense for your business and needs.
Clone to New Site
Sometimes you might want to use a site as a template or starting point for a new site. Our Clone to New Site feature makes this possible.
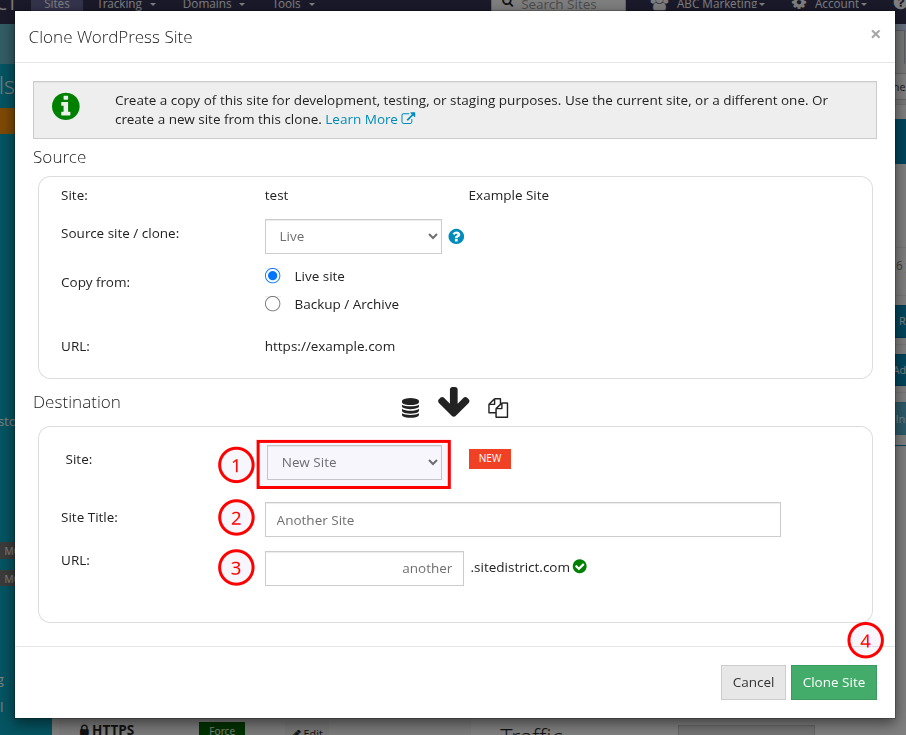
First, select Copy / Clone from the Cloning / Staging menu:
Then, select New Site for the destination site, and enter a new Site Title, and optionally, customize the URL for the new site. Then, click Clone Site.
Clone to Other Site
In other cases, you might have a site where as above, you want to use the site as a template or a starting point, but as a staging site or clone under an existing site, such as for a redesign.
To do this, select Copy / Clone from the Cloning / Staging menu:
Then, select Other Site for the destination site, select the
Parent Site where the new clone will be created, and optionally, edit the Clone nickname for the new clone. The URL for the clone is generated automatically using the existing SiteDistrict staging & clone URL convention.

Move Clone
In some cases, you might want to move a clone between completely different sites. Maybe you imported a staging copy of the site from another host, and you now want it located under the site that is being redesigned.
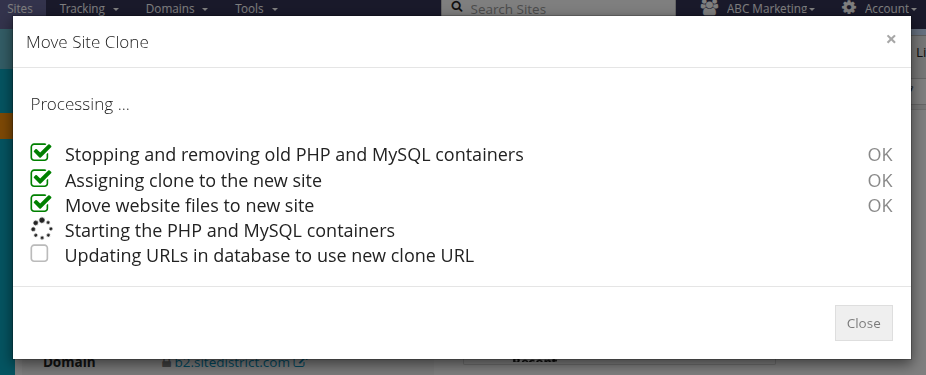
To use the Move Clone feature, select this option from the Clone / Staging menu:
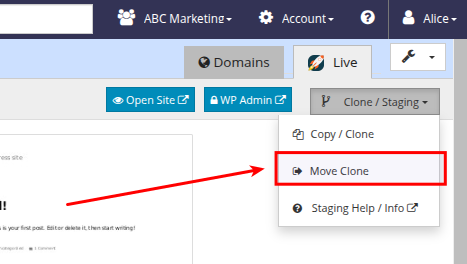
Then, select the Destination Site and enter a New Clone Nickname to use for the staging copy. The URL is automatically generated and will be updated for you.

Click Move Clone to complete the process.
Convert to Site
In some cases, you might find that you want to split a clone out into a completely different site, with a different domain. This is where the Convert to Site feature comes in handy.
By using this feature, you can promote a staging site to a top-level Site, which will show up separately in the Sites list in SITEDISTRICT and can have its own domain attached to it.
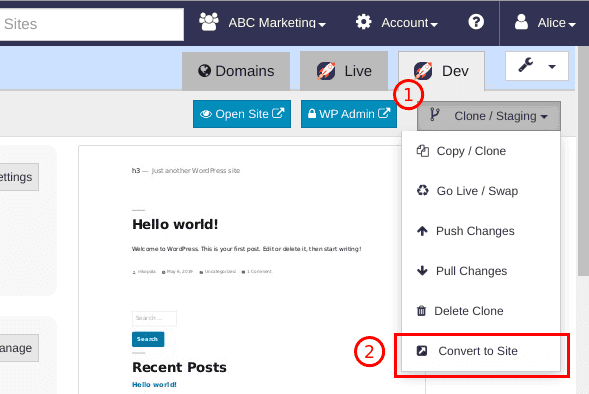
To convert an existing staging site / clone to a top-level site, select the Convert to Site option from the Clone / Staging menu:
You will be shown this dialog:
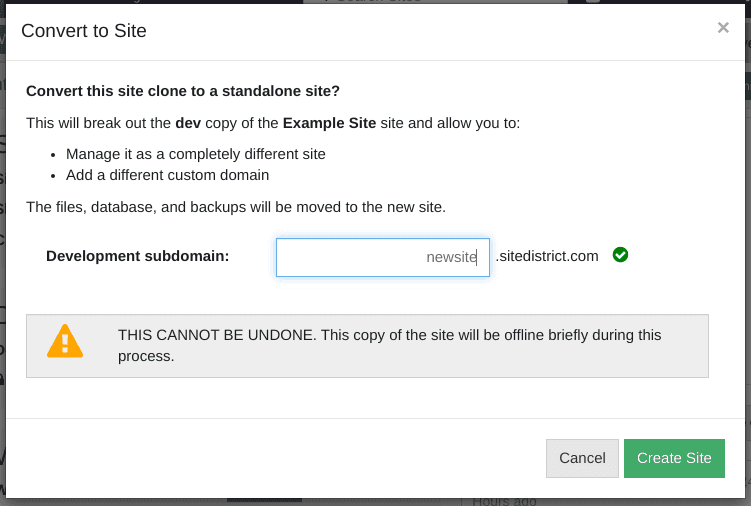
Pick a development subdomain to be used, and then click Create Site to do the conversion.
NOTE: Site clones that are converted to a new site are currently not counted towards your Average Sites count for billing purposes until you add a domain and update DNS to point the domain at SITEDISTRICT.
Other Uses
Staging From Another Host
SITEDISTRICT can also be used to create staging copies of sites that are hosted elsewhere. Some common reasons to do this are:
- The current hosting provider does not provide staging
- The current host has staging but does not provide HTTPS for some reason
- The staging system on the current host is slow or has issues
- You want to make changes for a client and will eventually convince your client to switch hosts to SITEDISTRICT.
- The current host does not back up the staging site (either at all or not as often as we do)
- You want to use many of the other features of our platform while developing the site
If you wish to use SITEDISTRICT in this way, follow the steps to import the site to our platform, and then simply use the Imported copy as your staging site.
NOTE: If for some reason you wish to move your changes back to the existing host, or you are unable to convince your client to switch hosting, you will need to manually migrate your changes back to the original host. There are several plugins that can help with this.
If you end up migrating the updates back to the existing hosting provider, you will hopefully find the time you saved developing on SITEDISTRICT was much greater than the time spent moving it back at the end.
Inactivity: Frozen Clones
One caveat of our cloning and staging system is that clones that are inactive for one week are "frozen" automatically by our system.
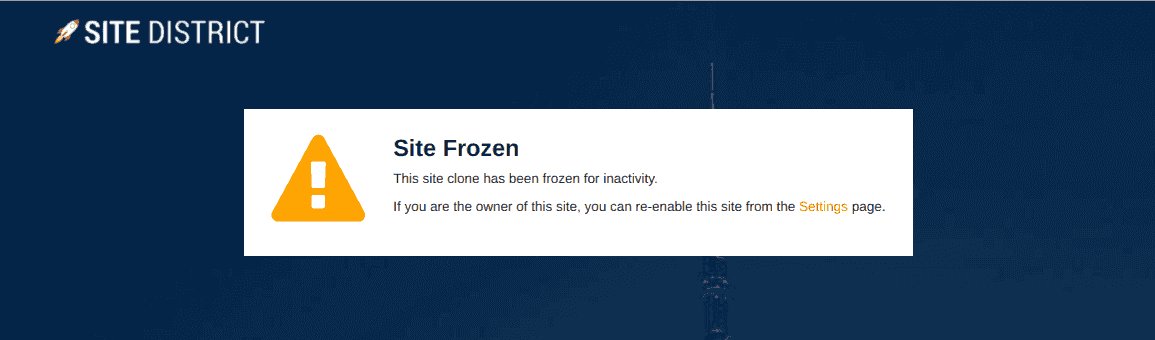
There are several reasons that this is done, but the main reason is to conserve server resources and make more room for active clones and live sites.
If you find that one of your clones or imported sites have been frozen, just click the orange Settings link on the page, and then you can re-enable the site.
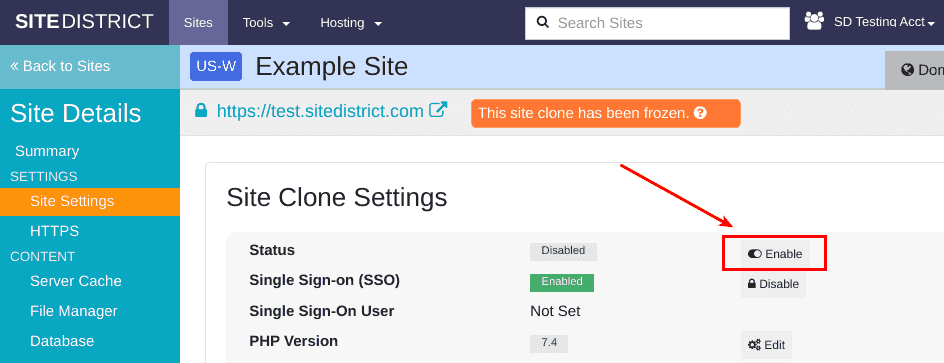
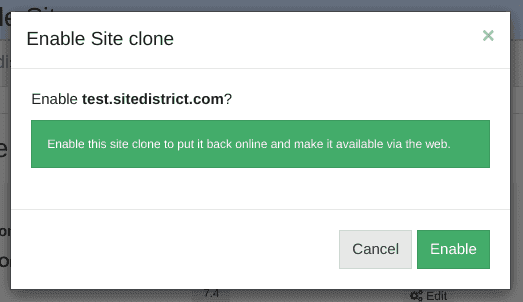
Click on the Enable button on the page across from Status, and then confirm by hitting the Enable button in the dialog:
New site clones and clones that are re-enabled won't be frozen (again) for at least two weeks.
NOTE: Live / Paid sites with an external domain pointed at them are never frozen.
Comparison / Summary
There is a lot of information on this page, but hopefully it helped you to understand our staging & cloning system better.
How does our system compare to other hosts? We are planning to create a feature matrix to make it easier to compare, but for now, here's a quick summary of our philosophy behind staging sites:
A good staging system for WordPress should be fast, flexible, and secure. Creating staging copies of sites should take seconds, not minutes. Staging sites should be securely isolated from other sites, as well as the live site and other staging copies. They should have HTTPS enabled by default.
You should be able to copy, swap, and push/pull changes between staging clones. Staging sites should be first-class copies of sites and should have their own backups. You should not have to manually update URLs after creating a staging copy. URLs for staging sites should be clean & should make it easy to identify the site.
SiteDistrict also takes cloning and staging even farther, letting you create, copy, and move clones around in just about any way that you would like, providing both flexibility, and a natural way to undo changes or change course in case of a mistake, or change of plans.
As a result, we believe we have the most powerful and complete WordPress staging system available. If you see something elsewhere that we're missing, or think of something that we haven't implemented, let us know!
If you agree with our take on WordPress staging, sign up for free, and try out our platform.
Please contact us with any comments, feedback, or suggestions. Enjoy!
 Twitter
 Facebook
 Linkedin